Publish ASP.NET Core 7.0 web apps to an Azure Virtual Machine

I've recently had to find a way to deploy an ASP.NET Core web app based on .NET 7 to a set of Azure Virtual Machines. It turned out that although the option is easily available in Visual Studio publishing settings, there are quite a lot of steps in the configuration of the Virtual Machine itself to enable that otherwise easy-looking deployment option. I will guide you in configuring your Azure VM to unleash Visual Studio publishing for applications built with the recent versions of .NET in this blog post.
Prerequisites
Before you can get started, make sure you have the following prerequisites:
- Visual Studio 2022;
- An ASP.NET Core 7.0 Web Application;
- One or more Azure Virtual Machines running Windows Server. The VMs I used ran Windows Server 2022.
Installing the required components on the Azure VM
There are quite a few things that need to be running on the virtual machine so that it can accept deployments from Visual Studio and host the ASP.NET core applications accordingly. These are namely:
- Internet Information Services (IIS) with Management Console;
- Web Management Service;
- Web Deploy 4.0;
- ASP.NET Core Hosting Bundle (includes everything you need to run applications - the .NET runtime, the ASP.NET Core runtime, etc.) - find the most recent version here https://dotnet.microsoft.com/permalink/dotnetcore-current-windows-runtime-bundle-installer. The script below installs v7.0.3, so make sure to change the link accordingly should you prefer to install a more recent version.
A note on the version of Web Deploy - as far as I know, there should be parity between the version of Web Deploy used by the client (in our case Visual Studio) and the server (the VM). The version of Web Deploy you are going to find available from the Microsoft Download Center is 3.6 but versions of Visual Studio 2017 and higher come with Web Deploy 4.0. But don't worry, I've managed to find the proper download link.
Here is the Windows PowerShell script that does all that for you:
# Install IIS (with Management Console)
Install-WindowsFeature -Name Web-Server -IncludeManagementTools

# Install Web Management Service (enable and start service)
Install-WindowsFeature -Name Web-Mgmt-Service
Set-ItemProperty -Path  HKLM:\SOFTWARE\Microsoft\WebManagement\Server -Name EnableRemoteManagement -Value 1
Set-Service -name WMSVC -StartupType Automatic
if ((Get-Service WMSVC).Status -ne "Running") {
    net start wmsvc
}

# Install Web Deploy 4.0
# Download file from Microsoft Downloads and save to local temp file (%LocalAppData%/Temp/2)
$msiFile = [System.IO.Path]::GetTempFileName() | Rename-Item -NewName { $_ -replace 'tmp$', 'msi' } -PassThru
Invoke-WebRequest -Uri 'https://download.visualstudio.microsoft.com/download/pr/e1828da1-907a-46fe-a3cf-f3b9ea1c485c/035860f3c0d2bab0458e634685648385/webdeploy_amd64_en-us.msi' -OutFile $msiFile
# Prepare a log file name
$logFile = [System.IO.Path]::GetTempFileName()
# Prepare the arguments to execute the MSI
$arguments= '/i ' + $msiFile + ' ADDLOCAL=ALL /qn /norestart LicenseAccepted="0" /lv ' + $logFile
# Execute the MSI and wait for it to complete
$proc = Start-Process -file msiexec -arg $arguments -Passthru
$proc | Wait-Process
Get-Content $logFile

# Install Microsoft .NET Windows Server Hosting
$dotnetHostingFile = [System.IO.Path]::GetTempFileName() | Rename-Item -NewName { $_ -replace 'tmp$', 'exe' } -PassThru
# Find the most recent version here: https://dotnet.microsoft.com/permalink/dotnetcore-current-windows-runtime-bundle-installer
Invoke-WebRequest -Uri 'https://download.visualstudio.microsoft.com/download/pr/ff197e9e-44ac-40af-8ba7-267d92e9e4fa/d24439192bc549b42f9fcb71ecb005c0/dotnet-hosting-7.0.3-win.exe' -OutFile $dotnetHostingFile
$dotnetHostingLogFile = [System.IO.Path]::GetTempFileName()
$arguments= '/install /quiet /log '+ $dotnetHostingLogFile
$dotnetHostingFile
$dotnetproc = Start-Process -file $dotnetHostingFile -arg $arguments -Passthru
$dotnetproc | Wait-Process
Get-Content $dotnetHostingLogFile

# Restart IIS
net stop was /y
net start w3svc
After the installation takes place, ports 8172 and 80 will be opened in the Windows Defender Firewall.
Executing the installation script
Now let me offer you two options for running the installation script.
Option A: Manual execution via RDP
That's the most obvious thing you will do if you just want to test out something. Simply RDP into the virtual machine, copy the script, open an elevated Windows PowerShell terminal, and execute it. Instead of RDP-ing into the machine, you can as well use Azure Bastion.
Option B: Execution on a scale using Custom Script Extension
By using Custom Script Extension you can automate the execution of the installation script over multiple Azure Virtual Machines. However, this setup requires you to do a little more preparation:
- Enable managed identity of the Virtual Machine if you haven't done so. In this example, I've enabled system-assigned identity. Should you decide to use a user-assigned one, you need to provide a value of either the property
clientIdorobjectIdboth of which are undermanagedIdentity. You can pass those as part of the parameters ofSet-AzVMExtensionin the script below. You can find more info about the structure of that object in the documentation. - Upload the installation script to an Azure Storage Account.
- Grant the managed identity access to the Storage Account so that it can access the installation script. I've granted it a
Storage Blob Data Readerrole on the Storage Account. - Enable the Custom Script Extension on the VM using the following PowerShell script. You'll need to have the relevant Az modules imported into your PowerShell session. Please make sure to change the strings from the first three lines to reflect the names from your environment:
$vmName = 'vm-aspnet-publish'
$storageAcctName = "savmscripts001"
$fileUri = @("https://$storageAcctName.blob.core.windows.net/scripts/install-aspnetcorehosting.ps1")

$setAzVmExtensionParams = @{
    VMName             = $vmName
    Name               = 'aspnetCoreHosting'
    Publisher          = 'Microsoft.Compute'
    ExtensionType      = 'CustomScriptExtension'
    TypeHandlerVersion = '1.10'
    Settings           = @{
        "fileUris" = $fileUri
    }
    ProtectedSettings  = @{
        commandToExecute   = 'powershell -ExecutionPolicy Unrestricted -File install-aspnetcorehosting.ps1'
        managedIdentity    = @{}
    }
}
$vm | Set-AzVMExtension @setAzVmExtensionParams
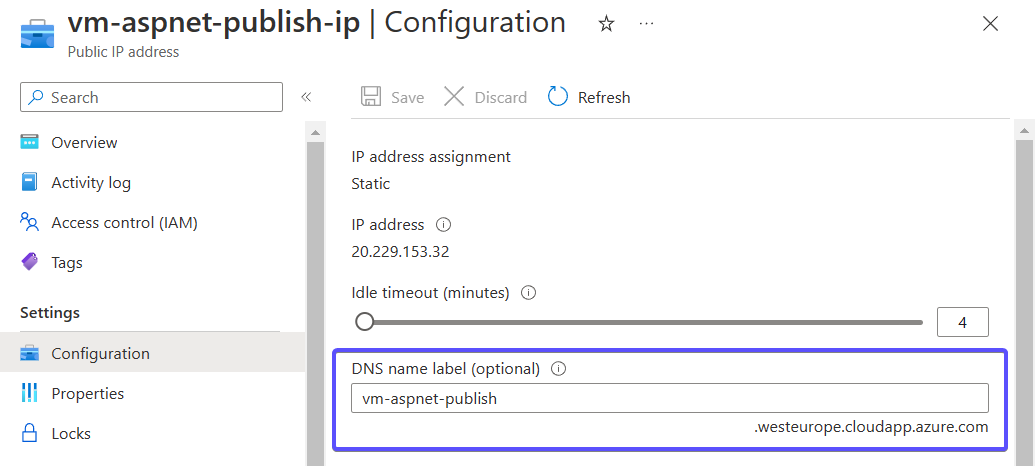
Configuring Inbound NSG rules and DNS name of the Public IP address
We are not done yet. If you try publishing from Visual Studio 2022 at this point, you will probably get one of the following error messages:
The specified virtual machine does not have a domain name associated with any public IP address.
Could not reach the Web Deploy endpoint on the specified machine.
This is because Web Deploy on the client side expects to talk to Web Deploy on the server on port 8172 at custom-dns-name.region.cloudapp.azure.com. With the following script, you can configure both:
$vmName = 'vm-aspnet-publish'
$vm = Get-AzVM -Name $vmName
$nic = Get-AzNetworkInterface -ResourceId $vm.NetworkProfile.NetworkInterfaces.Id

# Set a DNS name to the Public IP address
$pipName = $nic.IpConfigurations[0].PublicIpAddress.Name
$pip = Get-AzPublicIpAddress -Name $pipName
$pip.DnsSettings = @{DomainNameLabel = $vmName }
Set-AzPublicIpAddress -PublicIpAddress $pip

# Get NSG
$nsgName = $nic.NetworkSecurityGroup.Id -split '/' | Select-Object -Last 1
$nsg = Get-AzNetworkSecurityGroup -ResourceName $nsgName

# Add inbound rules to NSG
$httpInboundRule = @{
    Name                     = 'AllowAnyHTTPInbound'
    Access                   = 'Allow'
    Protocol                 = 'Tcp'
    Direction                = 'Inbound'
    Priority                 = 350
    SourceAddressPrefix      = "*"
    SourcePortRange          = '*'
    DestinationAddressPrefix = '*'
    DestinationPortRange     = 80
}
$nsg | Add-AzNetworkSecurityRuleConfig @httpInboundRule

$webDeployInboundRule = @{
    Name                     = 'AllowAnyWebDeployInbound'
    Access                   = 'Allow'
    Protocol                 = '*'
    Direction                = 'Inbound'
    Priority                 = 400
    SourceAddressPrefix      = "*"
    SourcePortRange          = '*'
    DestinationAddressPrefix = '*'
    DestinationPortRange     = 8172
}
$nsg | Add-AzNetworkSecurityRuleConfig @webDeployInboundRule

$nsg | Set-AzNetworkSecurityGroup
The script will also configure an inbound rule to allow the HTTP traffic on port 80 so that you can access the ASP.NET Core Web App that is hosted in the VM.
In Azure Portal things should look like this:

Creating the Visual Studio Publish Profile
Now that you have fulfilled all prerequisites, you're ready to deploy your ASP.NET Core Web App to the Azure Virtual Machine using Visual Studio. Here's how:
- Open your ASP.NET Core project in Visual Studio.
- Right-click on the project in the Solution Explorer and select "Publish".
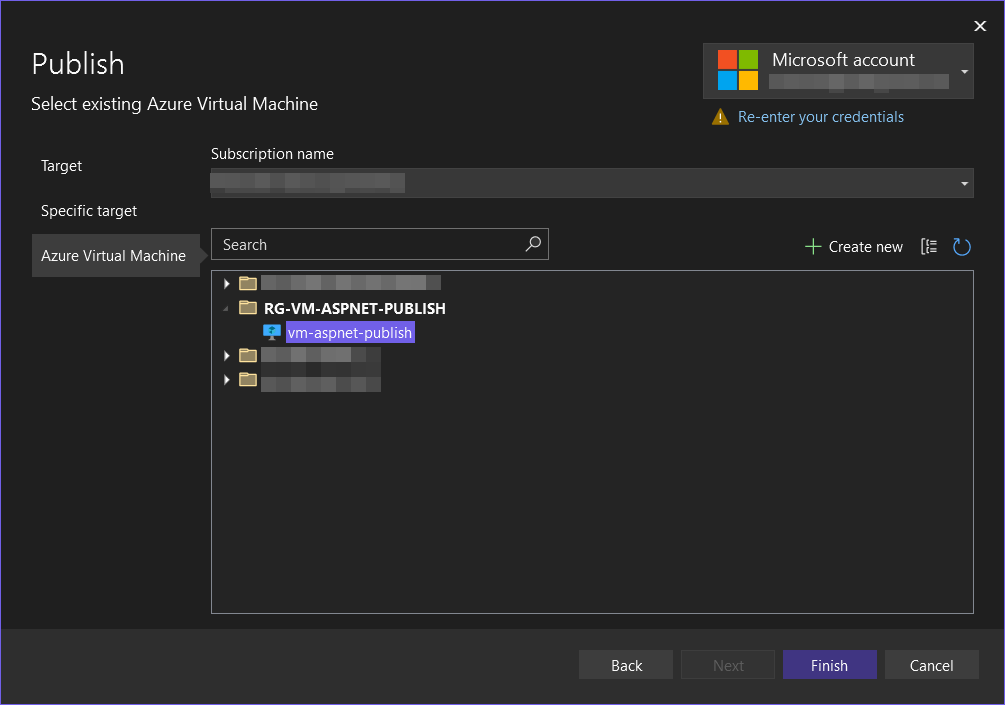
- In the Publish dialog, select "Azure" as a target.
- Select "Azure Virtual Machine" as a specific target environment.
- Find and select your virtual machine.
- If everything is as expected, the "Finish" button will become available, as seen in the screenshot below. Otherwise, an error message will be displayed.
- You know the drill, just hit "Publish".
Summary
In this blog post, I've covered everything you need to know to enable Visual Studio publishing of your ASP.NET Core project to your existing Virtual Machine in Microsoft Azure. From installing IIS, Web Deploy, and .NET on your VM to enabling inbound communication and setting up the DNS name of the Public IP address. And the best part? I've included some handy PowerShell scripts to make the process easy and stress-free. So go ahead and give it a try!