Passwordless deployments from GitHub Actions to Microsoft Azure

You've likely had to deploy something to Microsoft Azure. Whether that is a deployment of an application or a deployment of infrastructure, you always have to provide some unique information that you possess to authenticate. In this blog post, I will show you how you can make your life easier in case you use GitHub Actions workflows.
If you just deploy something very occasionally, you may use your personal account but in most cases deployments are done by some type of automated process - an Azure DevOps pipeline or GitHub Actions workflow, to name a few. In that case, you have to use credentials that are not tied to your personal account but rather to an application registration in your Azure Active Directory. That credential is typically a secret or a certificate.
What's wrong with secrets and certificates?
If you are into software development, you've mostly heard that having any secrets in a raw form in your source code is a bad practice. Having your code under source control even makes it worse! Yes, scanners that scan through your source code and flag any strings that look like a secret do exist but that's not the point.
Okay, you may think that if you follow all the good practices for handling secrets/certificates, you are on the safe side. But you are not. Creating such a credential is a two-step process - you generate it, then you copy-paste it to your target environment that will execute the deployment. For example, those credentials can be stored securely in Azure Key Vault, HashiCorp Vault, GitHub secret, etc. But obtaining and securely handling the credentials is still a manual process at large so there is room for mistakes. And credentials tend to leak with time. To somewhat mitigate the problem, you establish a process to periodically rotate credentials, which creates even more problems because not only can they leak but they also expire. This leads to problems with security and the stability of your applications.
So what's the solution? Don't use password-like credentials if you can. That's just as applicable for automated deployments as I explained in my post A guide to online account security.
What is passwordless auth?
To follow the passwordless way, you'll need to establish trust between your cloud provider (in this case Microsoft Azure) and your deployment pipelines. Microsoft announced the support of OpenID Connect for Azure Active Directory in late 2021 but in my opinion, it's still a highly underused feature. People are still attached to generating secrets and storing them somewhere.
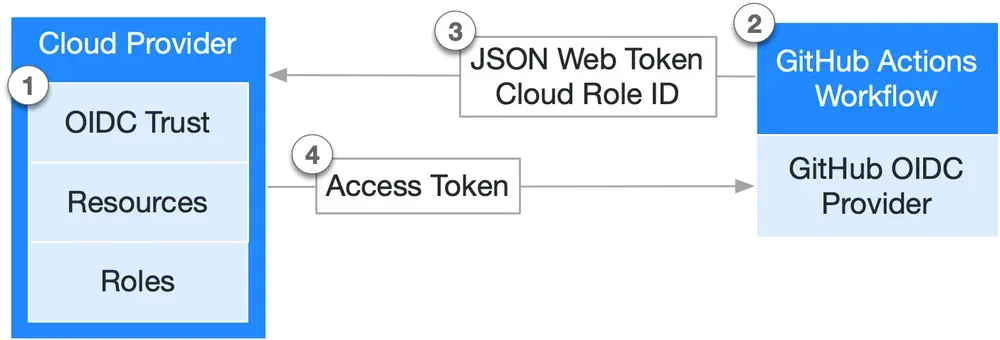
OpenID Connect is an authentication protocol built on top of OAuth 2.0. The two sides in the diagram above communicate without the need for exchanging a credential because trust is established between the two. Essentially, you instruct the cloud identity provider (in our case Azure Active Directory) to trust JSON Web Tokens (JWT) issued by GitHub. When AAD successfully recognizes and validates the incoming JWT, it returns an access token, just like it would do if you used an app registration secret or a certificate for authentication purposes. Then the access token is used by the GitHub Actions workflow to access resources in your Azure subscription. In other words, you allow a GitHub workflow to impersonate a security principal from your AAD tenant. This is also called workload identity federation and is specified in RFC 8693 OAuth 2.0 Token Exchange.
Let's look at how things can be configured on both ends.
Configuring federated identity credential
Firstly, in Azure Active Directory, you have two options for a security principal to choose from:
- Use an Application Registration. You can configure the application to trust an external identity provider by following the steps in the documentation.
- Use a User-Assigned Managed Identity. To configure the managed identity to trust GitHub by following the respective steps.
Whether to use one over the other, is up to you. Both are registered at the Azure Active Directory level and can have access to multiple Azure subscriptions. The managed identity lives as a native Azure resource, while the app registration has many dials and switches that allow you to configure a lot of things.
Have in mind that federated credentials for managed identites are not supported in all Azure regions.
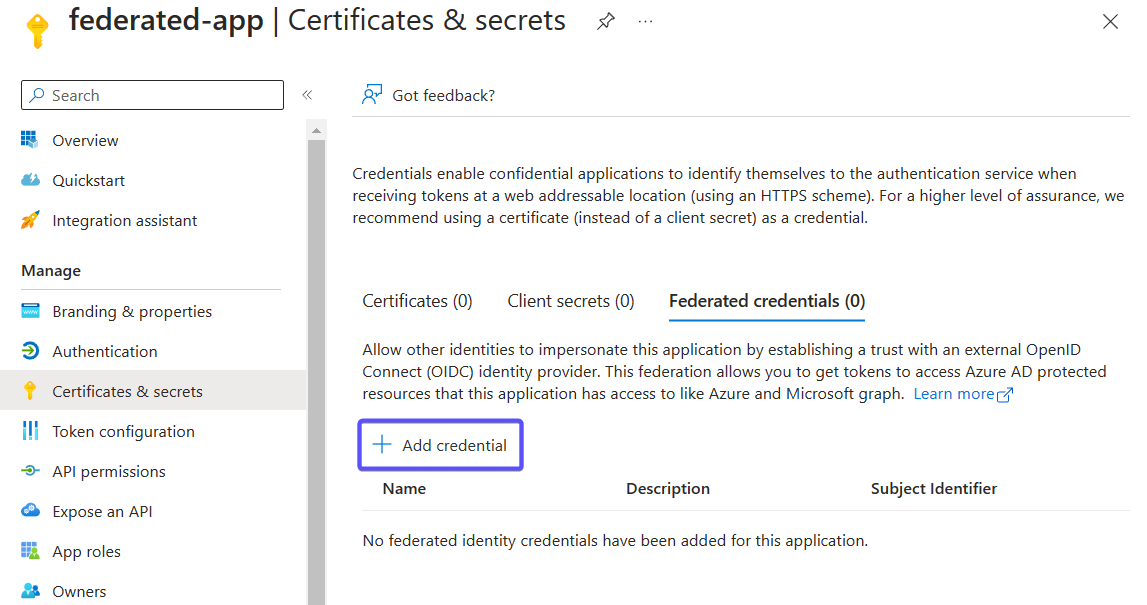
Here's how it looks for an Application Registration although you will be presented with an almost identical UI when you configure it for a Managed Identity:
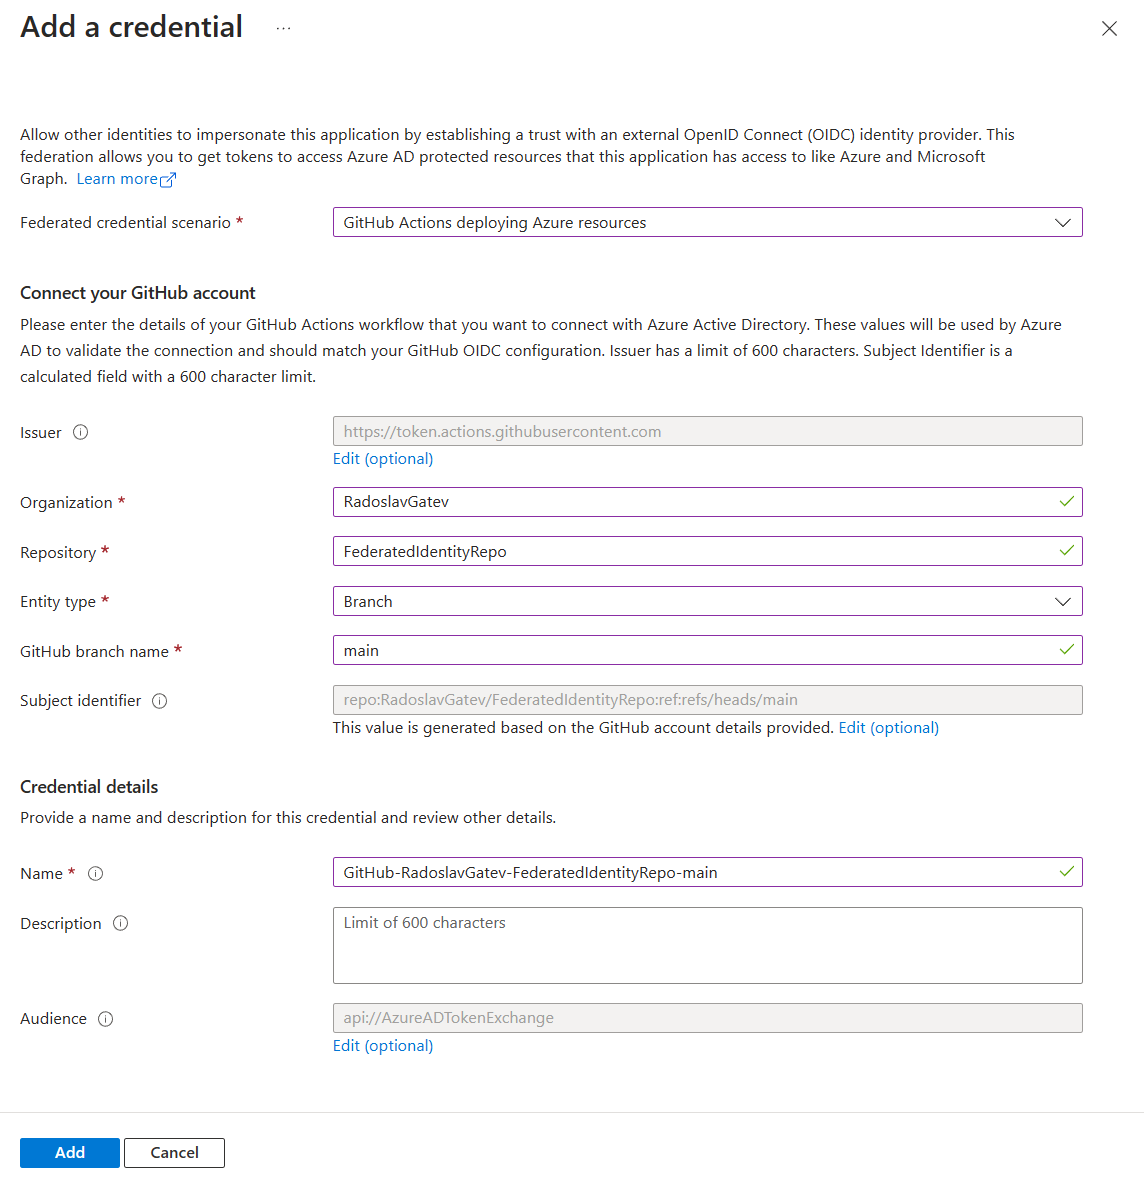
When selecting Entity type you are offered 4 choices - environment, branch, pull request, and tag. Here the Azure Portal guides you in configuring the format of the expected subject claim of the incoming JWT token. To successfully recognize the incoming subject, it should match the expected format. More on that will come later in the blog post.
Lastly, make sure to collect the ClientID, Tenant ID, and Subscription ID as you will need them later in GitHub. And of course, you will have to grant your service principal/managed identity some Azure RBAC role so that it can access resources within Azure.
The GitHub Actions workflow
Once the application registration or the user-assigned managed identity has been configured to trust incoming JWT tokens issued by GitHub, we need to create the GitHub workflow. But before we do that, let me take a step back to describe how things work on the GitHub side.
I guess you have heard about the automatic GITHUB_TOKEN that is available in every workflow run. It is typically granted some permissions so that your workflow can access some parts from GitHub as part of its operation. Those permissions can be assigned either for the overall workflow or at a specific job level. There is such a permission that controls whether you can generate a JWT token from your workflow run:
permissions:
   id-token: write # write is required for requesting the JWT
Let's proceed with the GitHub workflow. Luckily each major cloud provider offers an authentication action that helps you generate the JWT and exchange it for an access token. For Microsoft Azure, this is azure/login:
name: Run Azure CLI commands with OIDC
on: [push,  workflow_dispatch]

permissions:
      id-token: write # write is required for requesting the JWT
      contents: read

jobs:
  build-and-deploy:
    runs-on: ubuntu-latest
    steps:
      - name: 'Az CLI login'
        uses: azure/login@v1
        with:
          client-id: ${{ secrets.AZURE_CLIENT_ID }}
          tenant-id: ${{ secrets.AZURE_TENANT_ID }}
          subscription-id: ${{ secrets.AZURE_SUBSCRIPTION_ID }}
      - name: 'Run az commands'
        run: |
          az group list
Save this file at .github\workflows\workflow-name.yml. Client ID, Tenant ID, and Subscription ID are considered somewhat sensitive information, so make sure to have the values you collected at the end of the previous section persisted as secrets in your repository.
If everything is good, you will be able to see all the resource groups that the security principal has access to:
[
    {
        "id": "/subscriptions/***/resourceGroups/rg-core",
        "location": "westeurope",
        "managedBy": null,
        "name": "rg-core",
        "properties": {
          "provisioningState": "Succeeded"
        },
        "tags": {},
        "type": "Microsoft.Resources/resourceGroups"
      },
      ...
  ]
Advanced: Exploring the JWT token
It felt almost too easy! azure/login@v1 abstracts way too much if you want to understand what happens behind the scenes. If you don't pass any credentials to the Azure Login action, it attempts to use OpenID Connect as a fallback method. The first thing it will do is generate a JWT from GitHub by calling core.getIDToken(audience) from the core toolkit. Here is more information on the various ways to obtain a JWT: https://docs.github.com/en/actions/deployment/security-hardening-your-deployments/configuring-openid-connect-in-cloud-providers.
The next thing it must do is exchange the JWT for an access token issued by the Microsoft identity platform. Luckily, Connect-AzAccount already offers such a parameter called FederatedToken, so it simply utilizes it:
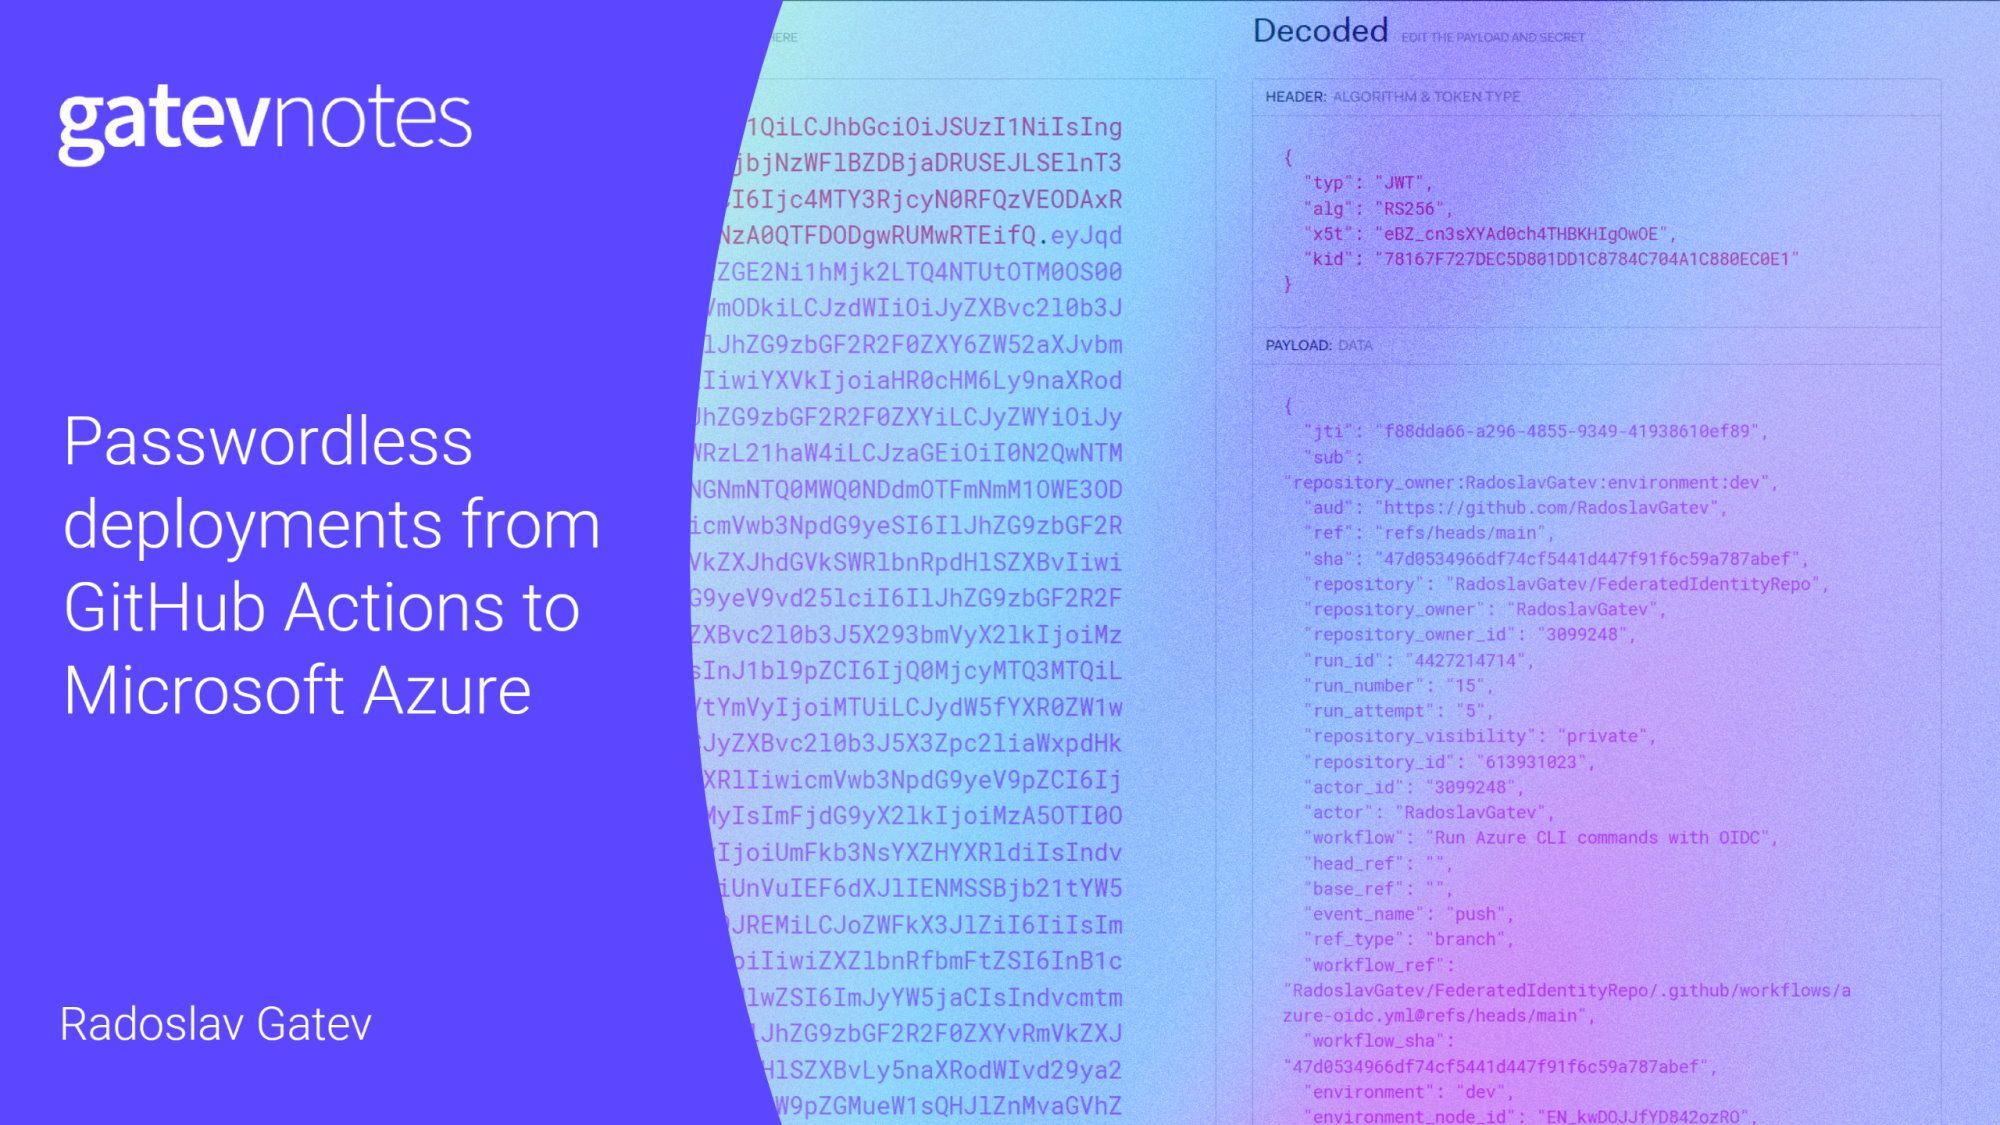
Connect-AzAccount -ServicePrincipal -ApplicationId '${args.servicePrincipalId}' -Tenant '${tenantId}' -FederatedToken '${args.federatedToken}' -Environment '${args.environment}'Here is the payload of a sample JWT:
{
  "jti": "cfa67dfb-bed4-447c-ac69-a3a9557531f0",
  "sub": "repo:RadoslavGatev/FederatedIdentityRepo:ref:refs/heads/main",
  "aud": "api://AzureADTokenExchange",
  "ref": "refs/heads/main",
  "sha": "30b8e95348f0dd7e4befede2e315281a5523c6da",
  "repository": "RadoslavGatev/FederatedIdentityRepo",
  "repository_owner": "RadoslavGatev",
  "repository_owner_id": "3099248",
  "run_id": "4420308259",
  "run_number": "14",
  "run_attempt": "1",
  "repository_visibility": "private",
  "repository_id": "613931023",
  "actor_id": "3099248",
  "actor": "RadoslavGatev",
  "workflow": "Run Azure CLI commands with OIDC",
  "head_ref": "",
  "base_ref": "",
  "event_name": "push",
  "ref_type": "branch",
  "workflow_ref": "RadoslavGatev/FederatedIdentityRepo/.github/workflows/azure-oidc.yml@refs/heads/main",
  "workflow_sha": "30b8e95348f0dd7e4befede2e315281a5523c6da",
  "job_workflow_ref": "RadoslavGatev/FederatedIdentityRepo/.github/workflows/azure-oidc.yml@refs/heads/main",
  "job_workflow_sha": "30b8e95348f0dd7e4befede2e315281a5523c6da",
  "runner_environment": "github-hosted",
  "iss": "https://token.actions.githubusercontent.com",
  "nbf": 1678828194,
  "exp": 1678829094,
  "iat": 1678828794
}
As you can see above, there are various claims sent within the JWT. To find out more about all supported claims check out either the OpenID Provider Configuration endpoint of GitHub or the documentation.
Among all claims, there are two that are of utmost importance for the Microsoft identity platform:
- Audience or
audis a string or array of strings that identifies the recipients that the JWT is intended for. Its value must beapi://AzureADTokenExchange. This is already done for you by the Azure Login GitHub action but make sure to specify the audience if you generate the token in any other way. - Subject or
subidentifies the workload that requested the JWT. GitHub follows a predefined format that is assembled by concatenating information about the workflow and the job context, such as GitHub organization, repository, branch, or environment. The resulting subject claim must exactly match what you have defined as an expected value as part of the federated identity configuration. Otherwise, the token exchange will be rejected. A few examples:repo:<orgName/repoName>:ref:refs/heads/branchName,repo:<orgName/repoName>:pull_request,repo:<orgName/repoName>:environment:<environmentName>.
Some identity providers allegedly support defining conditions using some expression language, e.g. Google's Common Expression Language (CEL). So in theory, you could base your logic not only on the subject claim. But that's not the case now for the Microsoft Identity platform - it doesn't even support wildcards, but rather requires exact matches. And maybe for a good reason - if you mess up your logic, in the worst scenario you could accept and trust pretty much any valid token coming from GitHub.
Some shortcomings
There should be an exact match between the value of the subject claim and the expected value in the identity federation configuration of the application registration or managed identity.
The default structure of the subject claim postulates the first segment is the full repository name and the other is based on the context of the event that triggered the workflow. If you specify an environment in your workflow, then the structure will be repo:<orgName/repoName>:environment:<environmentName>. If you don't specify an environment and the workflow is triggered by a pull request, then it will be repo:<orgName/repoName>:pull_request. In case the workflow neither specifies an environment nor is triggered by a pull request, then the structure can be repo:<orgName/repoName>:ref:refs/heads/branchName. If you run the workflow from a tag, you get the idea - repo:<orgName/repoName>:ref:refs/tags/<tagName>.
This brings some variety in the possible values of the subject claim. If you don't specify an environment in the workflow and you run it from either a branch or a tag, the number of possible values can quickly become unmanageable as you won't know the name of the branches or the tags in advance. However, if the way you use your repository and workflows is rather predictable, you can define all the expected values of the incoming subject claim by creating multiple federated identity credentials. In this example here, I've created 3 - for dev and main branches and one for pull requests:
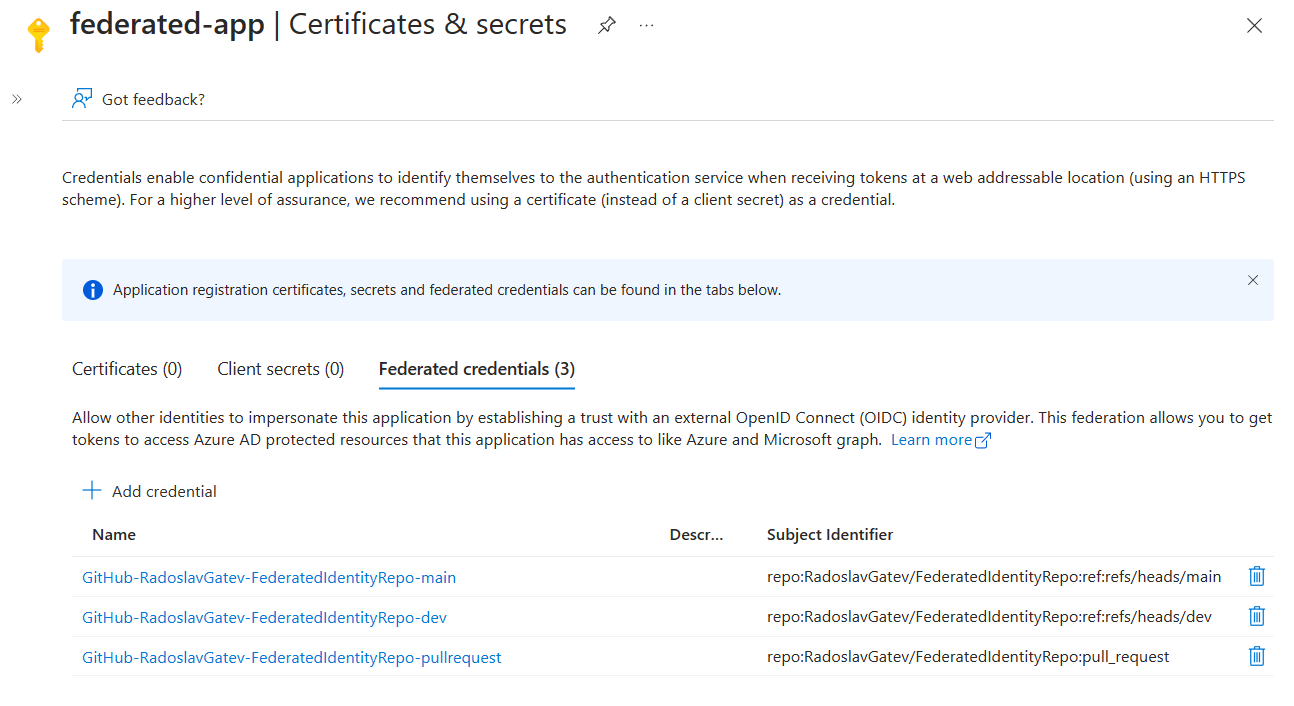
Unfortunately, you can only create up to 20 federated identity credentials per application registration or managed identity. Now imagine, if you had 50 repositories in your organization that you want to deploy to Microsoft Azure from. Each of the repositories can contain just some part of the whole solution you have in the cloud. In that case, you need to create an app registration/managed identity per repository as you will quickly reach the limit of 20 federated credentials. But that's probably impractical...
If you have multiple repositories that deploy to the same Microsoft Azure subscription, I suggest creating one app registration/managed identity per subscription. If you utilize a GitHub environment in your workflow, you won't have to have to maintain a federated identity credential per branch or tag. So that would simplify things a little.
Additionally, GitHub API offers a way to customize the template for the subject claim either on an organizational level or for a single repository. The default template looks like the following, where repo is outputted as repo:<orgName/repoName> and context claim is dynamic (based on the job context), e.g. ref:refs/heads/branchName or environment:<environmentName>:
{
    "include_claim_keys": [
        "repo",
        "context"
    ]
}
Let's remove the repository name from the subject claim template. I'm setting it for a single repo but you might want to do it organizational-wide:
curl --location --request PUT 'https://api.github.com/repos/RadoslavGatev/FederatedIdentityRepo/actions/oidc/customization/sub' --header 'X-GitHub-Api-Version: 2022-11-28' --header 'Authorization: Bearer github_pat_goes_here' --header 'Content-Type: application/vnd.github+json' --data-raw '{
    "use_default": false,
    "include_claim_keys": [
        "repository_owner",
        "context"
    ]
}'
After executing that PUT request the subject claim will come with a value repository_owner:<orgName>:environment:<environmentName> or repository_owner:<orgName>:pull_request. Make sure to add environment: environmentName to your workflow definitions. So in my case, the subject claim comes with the following value: repository_owner:RadoslavGatev:environment:dev.
Then go to your app registration or managed identity and add a new federated identity credential. You can either choose the GitHub Actions scenario or the Other issuer. If you selected the GitHub Actions scenario, click on the hyperlinked text to customize it. Have in mind that at the time of writing this post, the UI for creating a federated credential of a managed identity doesn't let you customize the default GitHub template. In that case just select Other issuer, as the other options do nothing special but help you to construct the final format of the subject claim.
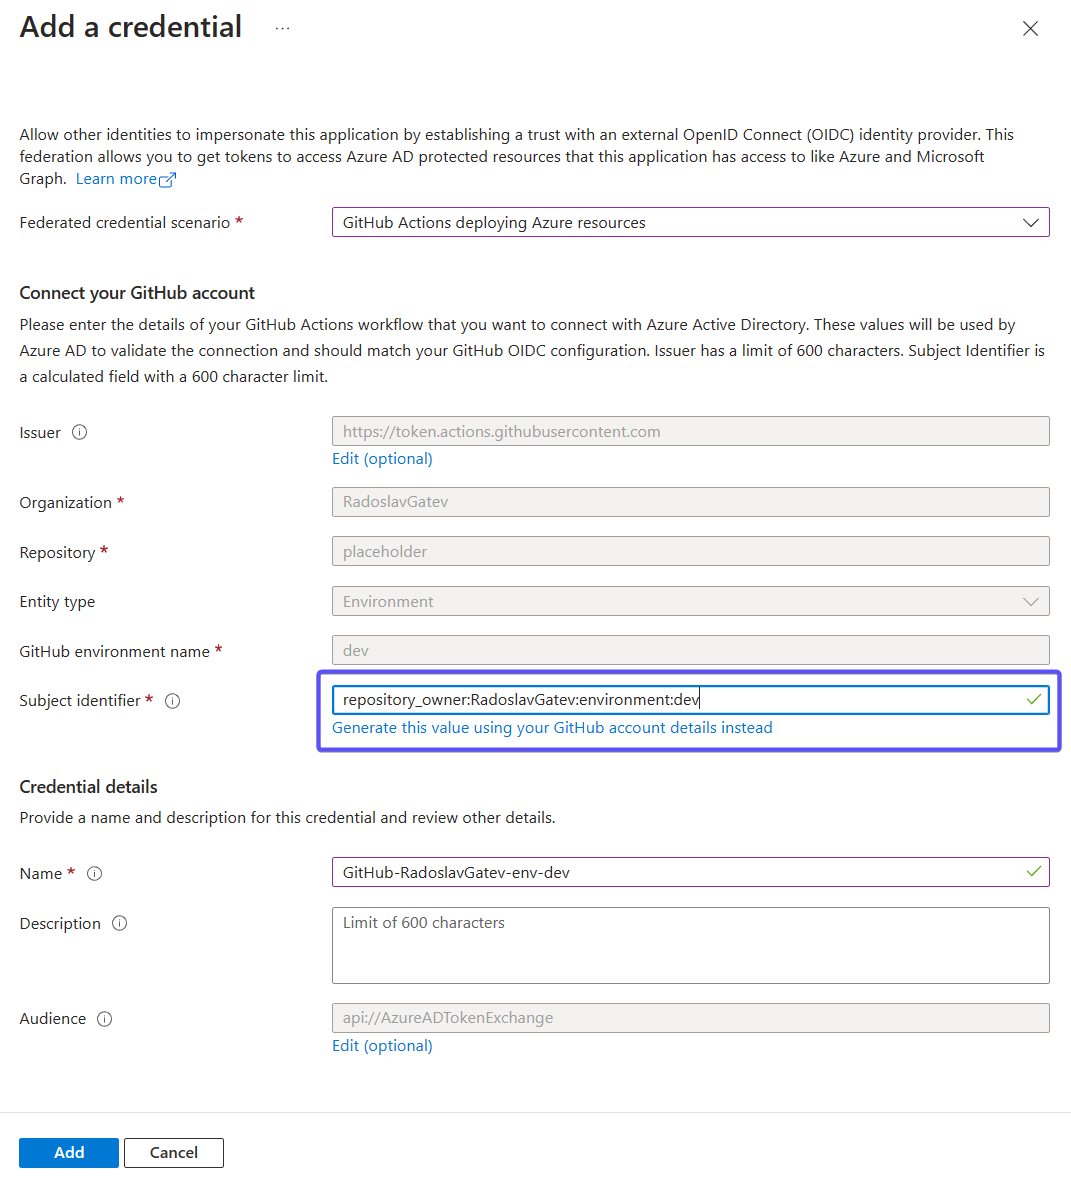
You are done. A simple federated credential that just specifies an organization and environment can authenticate all workflows in all repositories to which you applied the custom subject claim template.
Beware that there are certain risks with that approach - handing the Client ID of your security principal for a specific environment to any repository from the organization that has the subject claim template customization applied, gives immediate access to this particular environment. In other words, the Client ID serves as the key to the castle. Think about if this is a security concern for you or not.
Bonus question: Does Azure DevOps support this?
Yes, it is. See the blog post Workload identity federation for Azure deployments is now generally available.
Summary
In this blog post, I showed you how to authenticate to Microsoft Azure without using any credentials in raw form when deploying workloads from GitHub Actions workflows. At this point, you should be able to utilize workload identity federation in your organization and understand what limitations it has. Forget about passing or rotating credentials, go passwordless!