Continuous Integration & Continuous Deployment of SSDT Projects: Part 2, Creating Azure DevOps pipelines
CI/CD for databases is tricky! Let me show you how you can do it by using an SSDT project template and Azure DevOps.

Part 1: Make it repeatable and self-sufficient turned out to be a big hit in my blog. The Visual Studio database project template reached 20k installs. I got a number of questions about it and two of my readers (thanks!) asked me to do a second part to tell you about Release Management of databases in Azure DevOps (formerly Visual Studio Team Services, formerly Visual Studio Online).
I have seen projects that have CI/CD defined for their application code and not for their databases. And when they do releases they trigger the pipelines for the applications and deploy the database manually because it's tricky, they say. So, let me share what's the way I found to deal with all this complexity.
Before we start, what's new about this project template?
It's been exactly a year, and the Visual Studio project template already has 20k installs, and the interest in doing release management of database changes is still pretty high! Thanks, everyone!
That's why I decided to enable the support for Visual Studio 2019! It's available now at Visual Studio Marketplace! If you have any ideas on how to make it better go ahead and suggest them! Or even open a pull request in GitHub.
Getting started with Azure DevOps
Azure DevOps is the evolution of VSTS (Visual Studio Team Services). It is the result of years Microsoft using their own tools and developing a process for building and delivering products in an efficient and effective way. An interesting thing is that Azure DevOps is being developed by using Azure DevOps. What a recursion, huh!
I think of Azure DevOps as the union of VSTS (Visual Studio Team Services), TFS (Team Foundation Server) and Azure, with some improvements and a few extras added. So, what was called VSTS is now Azure DevOps Services which is still a cloud offering with 99.9% SLA. And what was called Team Foundation Server (TFS) is now called Azure DevOps Server - the on-premises offering that's built on a SQL Server back end.
Azure DevOps is split into multiple subservices:
- Azure Boards - Powerful work tracking with Kanban boards, backlogs, team dashboards, and custom reporting.
- Azure Repos - a set of version control tools that you can use to manage your code. Two types of version control systems, Git and Team Foundation Version Control (TFVC).
- Azure Pipelines - CI/CD that works with any language, platform, and cloud. Every open source project gets unlimited CI/CD minutes for free.
- Azure Artifacts - Maven, npm, and NuGet package feeds from public and private sources.
- Azure Test Plans - All in one planned and exploratory testing solution.
If you want to learn more about the DevOps practices at Microsoft, visit the DevOps Resource Center.
In this post, we are going to focus on Release Management with Azure Pipelines.
Prerequisites
Set up your project to use the Continuous Deployment template which is based on the standard SSDT (SQL Server Data Tools) project. Follow the steps from Part 1: Make SSDT projects repeatable and self-sufficient, if you haven't done so.
Create an Azure DevOps project if you haven't done so. You can keep your source code both internally in Azure Repos or externally (GitHub, Subversion, Bitbucket Cloud or External Git).
You will need access to an active Azure subscription.
Let's create a build pipeline
As promised, we'll be looking at pipelines in this post. The first part of the chain is the definition of a build pipeline. After the code has been committed to Azure Repos, a build can be triggered. Of course, there are always options to schedule it or to manually trigger it.
Navigate to dev.azure.com. Go to Pipelines in your project and create a new Build pipeline. Then you have to tell it where your source code is. Choose an empty template.
Your build pipeline will look like this:

Let's review each task individually.
Visual Studio Build
This task will build the whole solution while. If your database project is configured properly it will produce a DACPAC file which becomes the main artifact containing the definition of the entire database.
You can pass MSBuild Arguments, change build platform and build configuration. I've exposed variables for Platform and Configuration in order to make it reusable. Platform is set to any cpu, Configuration is set to release.
More info about Visual Studio Build Task.
Copy Files to the staging directory
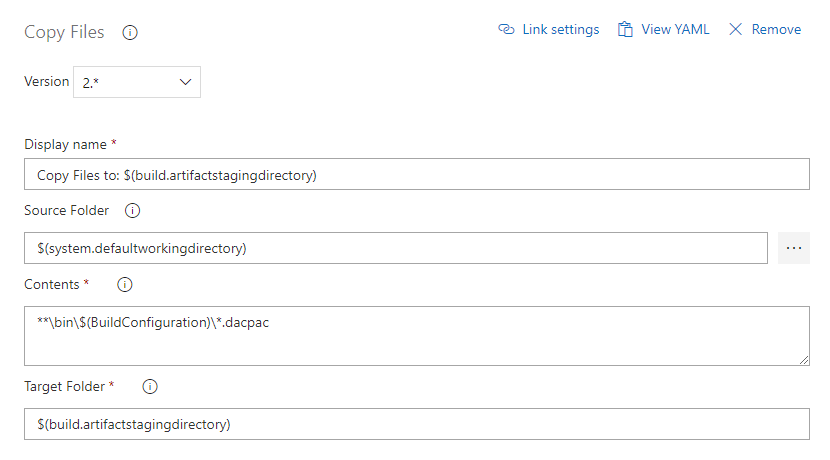
More info about Copy Files task.
Publish Artifact
This produces the end result of the build which will be consumed by the Release pipeline.
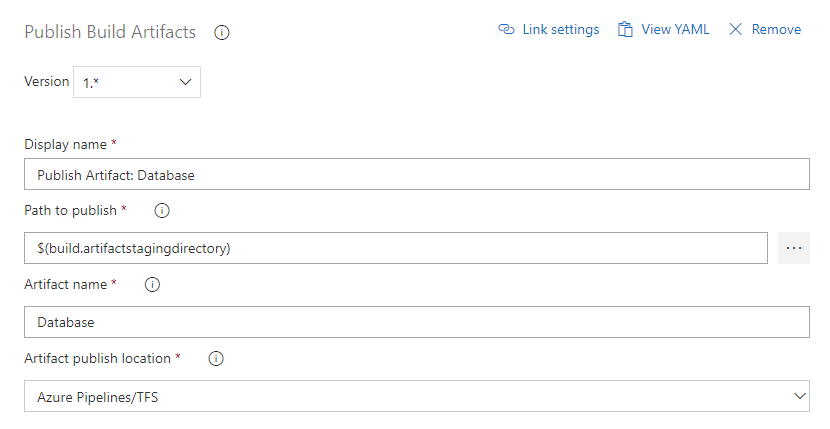
More info about Publish Build Artifacts task.
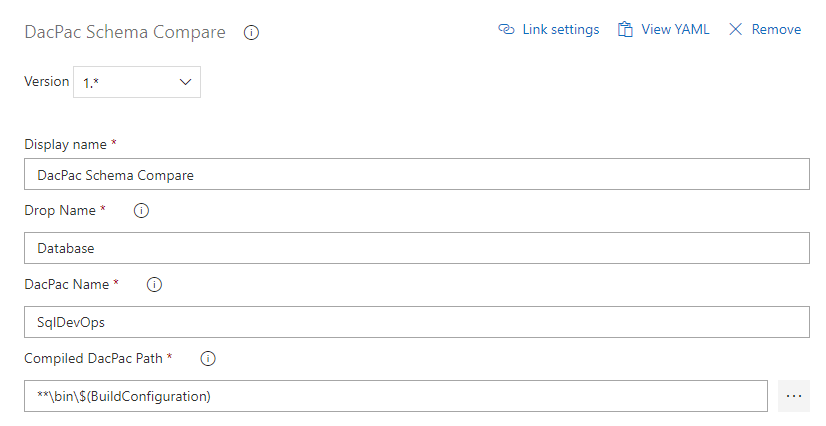
DacPac Schema Compare
As its name suggests, this tasks shows the schema changes of your database between two builds and outputs the results to the build summary. This task comes as a part of Colin's ALM Corner Build & Release Tools which you have to install from the marketplace.
You must enable the Allow Scripts to Access OAuth Token option which can be found in Build Options, as you can see below:
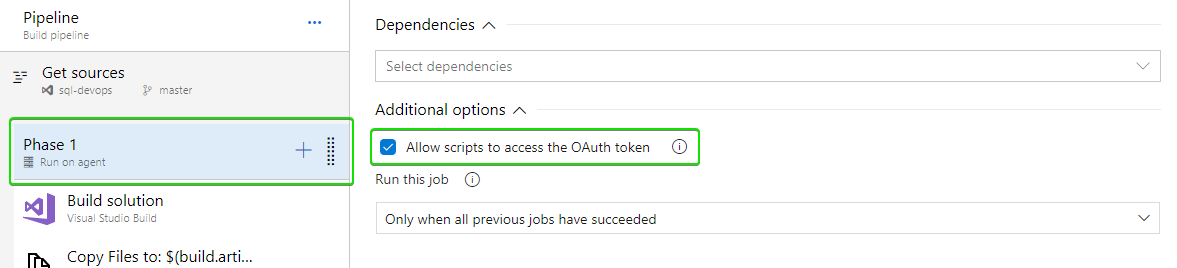
If you don't do so, you will get an error stating that the token for authenticating cannot be found.
You can see how this task is configured below. Compiled DacPac Path is used to find the dacpac produced by the current build. Drop Name is the name of the artifact produced by the previous build.
Go ahead and trigger a build!
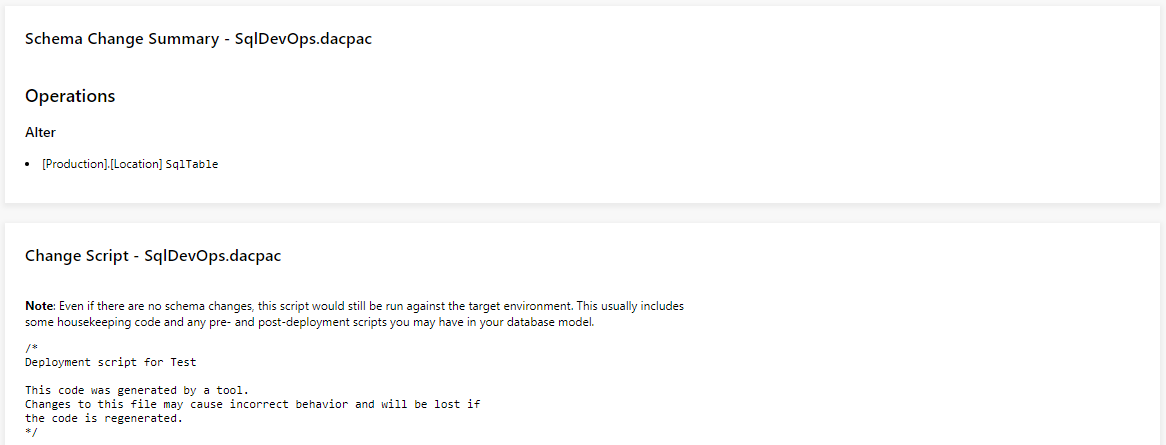
You will find two reports in the Build summary generated by this task. Therefore you will be able to see what is going to be executed against your real database (Assuming no one messed around with it manually):
Let's create a release pipeline
Go to Pipelines > Releases and create a new empty Release pipeline.
Set artifacts
Add a new artifact - choose Build as an artifact source type and select the Build pipeline producing it.
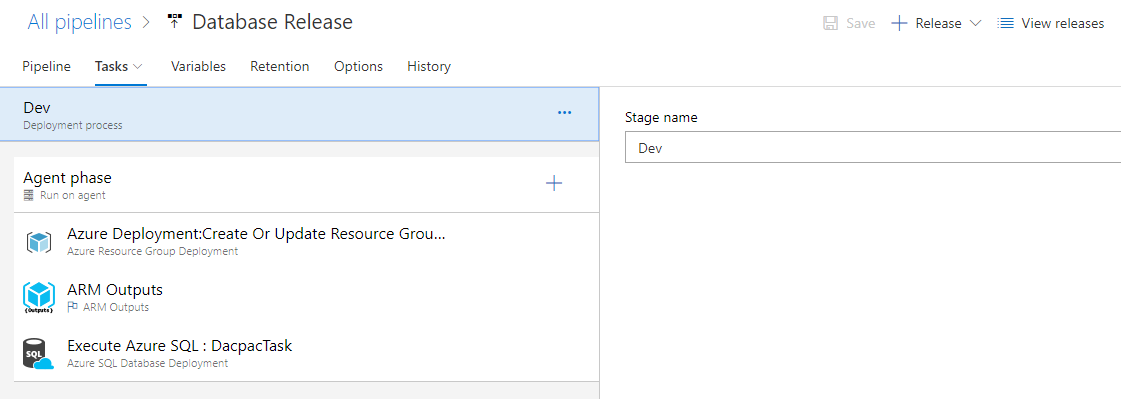
Go and edit the first stage of you release pipeline. By the end of this part it will look like this:
Resource Template Deployment
We are going to deploy against an Azure SQL Database in this post. So, let's go straight to the Azure portal and create it? No! Because that's not DevOps! Infrastructure as code, as a key DevOps practice, says that you have to manage and provision everything through machine-readable definition files, rather than physical hardware configuration or interactive configuration tools.
We need an ARM (Azure Resource Manager) Template for a database. Let's take a look at one such:
{
  "$schema": "http://schema.management.azure.com/schemas/2015-01-01/deploymentTemplate.json#",
  "contentVersion": "1.0.0.0",
  "parameters": {
    "sqlDatabaseName": {
      "type": "string",
      "metadata": {
        "description": "The name of the database"
      }
    },
    "sqlAdministratorLogin": {
      "type": "string",
      "metadata": {
        "description": "The admin user of the SQL Server"
      }
    },
    "sqlAdministratorLoginPassword": {
      "type": "securestring",
      "metadata": {
        "description": "The password of the admin user of the SQL Server"
      }
    }
  },
  "variables": {
    "sqlserverName": "[concat('sqlserver', uniqueString(resourceGroup().id))]"
  },
  "resources": [
    {
      "name": "[variables('sqlserverName')]",
      "type": "Microsoft.Sql/servers",
      "location": "[resourceGroup().location]",
      "tags": {
        "displayName": "SqlServer"
      },
      "apiVersion": "2014-04-01",
      "properties": {
        "administratorLogin": "[parameters('sqlAdministratorLogin')]",
        "administratorLoginPassword": "[parameters('sqlAdministratorLoginPassword')]",
        "version": "12.0"
      },
      "resources": [
        {
          "name": "[parameters('sqlDatabaseName')]",
          "type": "databases",
          "location": "[resourceGroup().location]",
          "tags": {
            "displayName": "Database"
          },
          "apiVersion": "2015-01-01",
          "dependsOn": [
            "[variables('sqlserverName')]"
          ],
          "properties": {
            "edition": "Basic",
            "collation": "SQL_Latin1_General_CP1_CI_AS",
            "maxSizeBytes": "1073741824",
            "requestedServiceObjectiveName": "Basic"
          }
        },
        {
          "type": "firewallrules",
          "apiVersion": "2014-04-01",
          "dependsOn": [
            "[variables('sqlserverName')]"
          ],
          "location": "[resourceGroup().location]",
          "name": "AllowAllWindowsAzureIps",
          "properties": {
            "endIpAddress": "0.0.0.0",
            "startIpAddress": "0.0.0.0"
          }
        }
      ]
    }
  ],
  "outputs": {
    "SqlServerFQDN": {
      "type": "string",
      "value": "[reference(concat('Microsoft.Sql/servers/', variables('sqlserverName'))).fullyQualifiedDomainName]"
    }
  }
}
The template above accepts 3 input parameters - sqlDatabaseName, sqlAdministratorLogin and sqlAdministratorLoginPassword. Then it creates a SQL server containing a single database. The location of the resources comes from the resource group. And finally, it outputs the FQDN of the server so the tasks following the Resource template deployment will be able to use it.
By no means, this is the perfect definition of a Resource template but it's simple enough and it works. For the sake of simplicity, I have this uploaded to a gist in GitHub which is being easily referenced by URL upon deployment. Ultimately, you will have more projects than just the database in your CI/CD pipelines. So you will probably be going to consider using one or more Resource Group projects in Visual Studio, building and validating them, exposing them as a separate artifact and eventually deploying them.
Go to your first Stage in the Release Pipeline and add Azure Resource Group Deployment task. You will have to create a Service connection of type Azure Resource Manager which will grant Azure DevOps the rights to access your Azure subscription.
It will look like this:
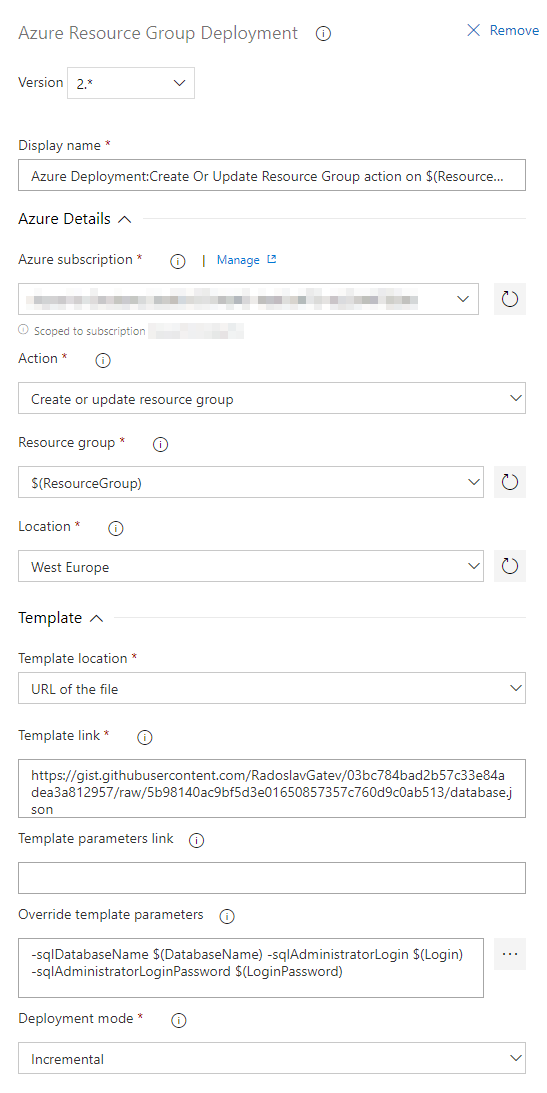
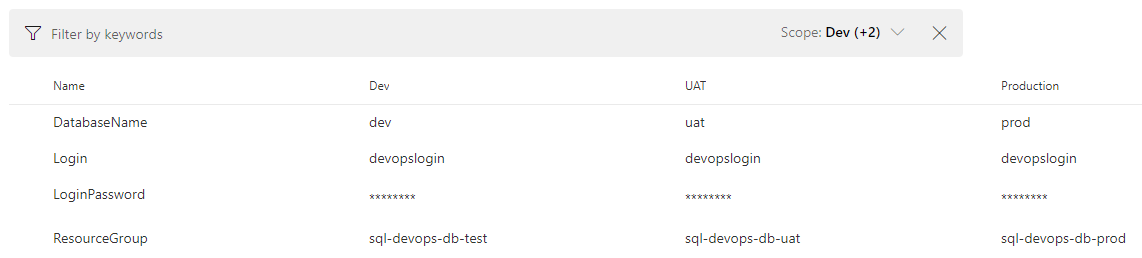
Maybe you have noticed that I've exposed some variables like $(ResourceGroup) and $(DatabaseName). That's because I prefer to make those things reusable so you can copy them across environments or even create Task groups.
You have to be careful with the Deployment mode. Choose Incremental as it leaves unchanged resources that exist in the resource group but are not specified in the template as opposed to Complete mode which deletes resources that are not present in your templates.
More info about Azure Resource Group Deployment Task.
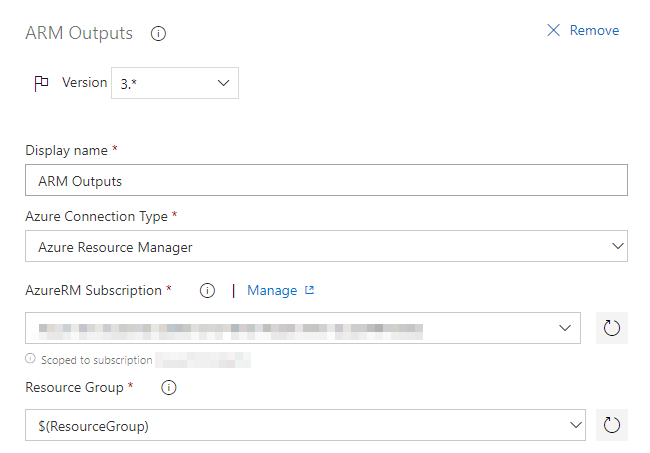
ARM Outputs
I found the ARM Outputs pretty useful because it lets you use the output values of an ARM template as variables in Azure Pipelines. ARM templates are the thing forming up your resource names based on some input parameters, and they also have direct access to Microsoft Azure.
Install this extension from Azure DevOps Marketplace.
Azure SQL Database Deployment
And finally, that is the task executing the actual database deployment. You give it a DACPAC file and it deploys all your database changes using SqlPackage.exe under the hood. Apart from the essential parameters you can pass additional parameters like /p:IgnoreAnsiNulls=True, /p:IgnoreComments=True, /p:BlockOnPossibleDataLoss=false or /p:DropObjectsNotInSource=true just to name a few.
I am using the same variables as in the ARM template deployment.
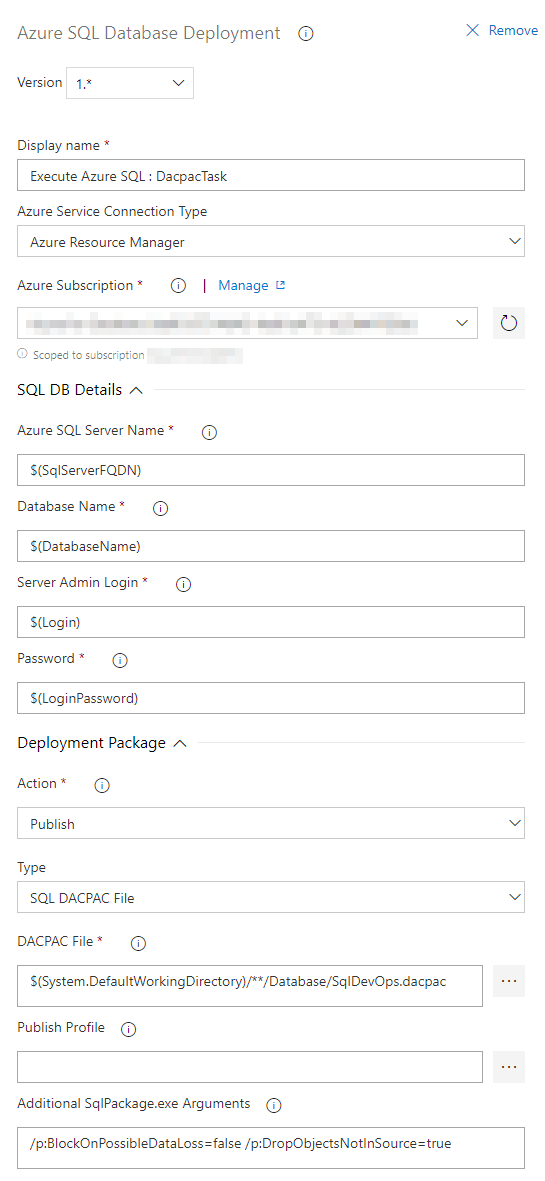
More info about Azure SQL Database Deployment Task.
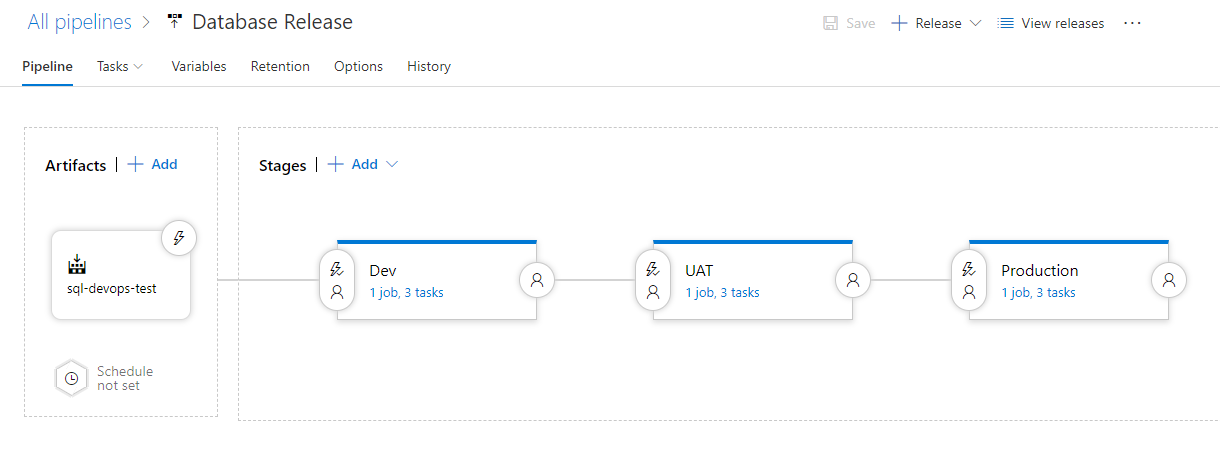
Set up environments
Having this reusable definition, we can go ahead and clone the stage in order to define multiple environments. Add as many as you would like. And not only that, you can create the relationships between them, the pre- and post-deployment conditions, approvals and other options.
I hope this is helpful for you! I would love to know more about how you typically deploy your databases in your organization.